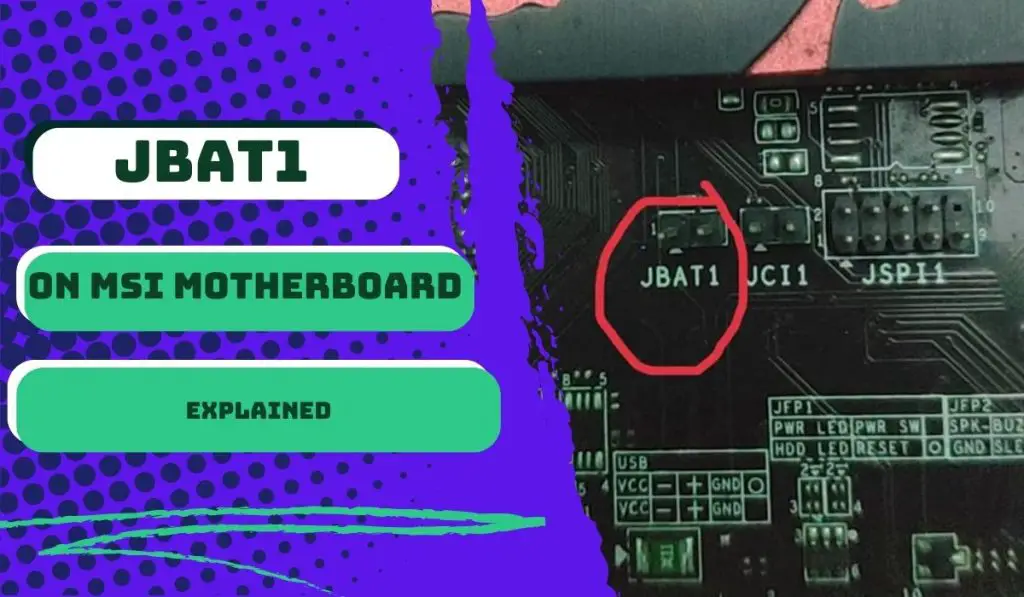
JBAT1 is a jumper on MSI motherboards that clears the CMOS (Complementary Metal Oxide Semiconductor) settings. It is a two-pin header that a jumper cap can shorten. JBAT1 is usually located near the CMOS battery on the motherboard, and its function is to reset the BIOS (Basic Input/Output System) settings to their default values.
Perhaps you want to reset your CMOS with the JBAT1 pins, but as with every other part of your motherboard, you’re being extra careful to ensure you’re doing it right.
You could even have a different JBAT1 PIN than most others. And maybe you don’t even have the jumper that the manual mentions.
In the rest of this article, you will learn all you need to know about the JBAT1 jumper on an MSI motherboard, how to use the right pins, and how to short the JBAT pins with a screwdriver.
How do you short a JBAT1 to reset my CMOS?
If you look into the MSI motherboard manual on resetting the CMOS, the instruction reads that you short the JBAT1. Here’s how to do it:
Step 1: Turn off the computer and unplug the power cord.
Step 2: Move the JBAT1 jumper from its default to the clear CMOS position.
Step 3: Wait a few seconds, and then move it back.
Step 4: Reconnect the power cord and turn on the computer.
But if you have a jumper, you can use it to connect the two pins. But for a little extra care in your hands and approach, you can put a screwdriver between the two pins. Then, ensure it touches both pins, but don’t let this exceed 5 to 10 seconds.
You shorted JBAT1 to clear CMOS, but it was unsuccessful.
I have also encountered rare cases where it remains unsuccessful after unplugging the power connector and shorting the JBAT1 to clear the CMOS.
While this can happen with your MSI motherboard, the general alternative to clearing the CMOS is to reseat the CMOS battery.
But before you do that, there’s a reason why the JBAT1 jumper did not work. Remember that you don’t need to unplug the power connector when clearing CMOS, particularly on some MSI motherboards (MSI MAG B550 TOMAHAWK, for example).
So consider plugging in the power connector, turning on the PSU, and shorting the JBAT.
Still no dice? Then you need to reset the CMOS by reseating the CMOS battery. This method is a surefire approach because the battery maintains settings on the motherboard. Here’s how you go about it:
Step 1: Turn off your computer and unplug the power cord.
Step 2: Correct possible PSU capacitor charges by pressing the power button multiple times.
Step 3: Find the 3V CR2032 battery in the motherboard and gently remove it from the holder.
Step 4: Wait a few minutes to ensure the CMOS is clear, then reseat the battery into the holder afterward.
Step 5: Plug in the power cord and turn on your computer.
That way, you have cleared the CMOS of your MSI motherboard without using the JBAT1 jumper.
What happens when you clear CMOS with the JBAT1 jumper?
Whether you reseat the CMOS battery or use the JBAT1 jumper, clearing the CMOS on your MSI motherboard does one thing: It resets your BIOS or UEFI settings back to their factory default state.
With this reset, you can reprogram the motherboard in case of software glitches or operational malfunctions.
The MSI BIOS interface allows you to clear CMOS from within the menu. But if you can’t access the BIOS environment (boot loop condition), you can use the JBAT1 jumper.
Problems associated with JBAT1 on MSI motherboards and solutions
Since JBAT1 on MSI motherboards aids in clearing the CMOS memory, where system configuration data such as date, time, and hardware settings are stored, it is not farfetched that MSI users encounter problems with this jumper.
But for every problem, there’s a solution. Below are five different possible issues with JBAT1 on MSI motherboards that you’re likely to experience, along with their solutions:
- CMOS battery failure: The CMOS battery powers the CMOS memory even when the computer is turned off. If the battery fails, the CMOS memory may lose its settings, causing issues with the JBAT1 jumper. To solve this issue, you’ll have to replace the CMOS battery with a new one.
- Jumper misconfiguration: If the JBAT1 jumper is not configured correctly, it may prevent the computer from booting up. As the motherboard manual indicates, ensure the jumper is in the correct position.
- Jumper dislodgement: Sometimes, the JBAT1 jumper may become dislodged or loose, causing issues with the CMOS memory. Check the jumper’s connection and make sure it is firmly in place.
- Malfunctioning BIOS: The BIOS firmware is responsible for initializing the hardware and loading the operating system. If the BIOS is corrupt or malfunctioning, it may cause issues with the JBAT1 jumper. Try flashing the BIOS with the latest firmware version from the MSI website.
- Hardware failure: If none of the above solutions work, there may be an issue with the motherboard or other hardware components. You may have to contact MSI support to diagnose and resolve the issue.
Wrapping up
Power outages, incorrect BIOS settings, hardware incompatibilities brought on by particular configurations, and other factors frequently result in BIOS data corruption. A standard solution is to reset CMOS to its default settings.
Also, before installing a new CPU on some MSI motherboards, clearing the CMOS and reset the BIOS is a safe approach.
For these reasons, the JBAT1 jumper on an MSI motherboard isn’t overlooked because it aids in clearing CMOS memory.
I hope this article clarifies if you’ve been confused about the JBAT1 jumper and pin orientation on your MSI motherboard.
If there’s a peculiar issue with using the JBAT1 on your motherboard that I didn’t touch on in the above article, it’s a fantastic opportunity to leave your thoughts in the comments.
FAQs
How do I short jbat1 with a screwdriver?
To short a JBAT1 with a screwdriver, put the screwdriver between the two pins to touch both pins, but don’t keep them connected for more than 10 seconds.
I have to warn, though, that shorting JBAT1 with a screwdriver is a potentially dangerous action that could damage your computer hardware or cause harm to you, especially when you attempt this without proper knowledge of and experience handling computer components.
How do I reset my CMOS without a jumper cap?
To reset your CMOS without a jumper cap, turn off your computer and unplug it from the power source.
Locate the CMOS battery on your motherboard, remove it for a few minutes, and reinsert it. This should reset the CMOS to its default settings.
How do I reset the BIOS without clearing the CMOS?
To reset the BIOS without clearing the CMOS, enter the BIOS setup utility by pressing the appropriate key during startup (usually F2 or Del).
Locate the option to reset to default settings and select it. Save and exit the BIOS.
This will reset the BIOS to its default settings but not the CMOS.
Remember that some BIOS settings may still need to be reconfigured manually.


![MSI EZ Debug LED - How To Troubleshoot and Fix[Guide] 4 How to Troubleshoot MSI Debug LED](https://bestofmotherboard.com/wp-content/uploads/2022/02/How-to-Troubleshoot-MSI-Debug-LED.jpg)
![What is Game Boost MSI - [Detailed-Guide] 5 What is Game Boost MSI](https://bestofmotherboard.com/wp-content/uploads/2022/02/What-is-Game-Boost-MSI.jpg)
![[Fixed] MSI Motherboard White Light 6 MSI-Motherboard-White-Light](https://bestofmotherboard.com/wp-content/uploads/2022/10/Asus-Motherboard-White-Light.jpeg)