To find a USB 3.0 port on a motherboard, look for the blue USB header, check the labeling for “SS” or “USB 3.0,” check the manual, look near the front panel, PCIe slots, and RAM, or use a cable splitter to increase the number of available ports. These methods can help you find the USB 3.0 ports on different motherboards and take advantage of the fast speeds offered by this technology.
Once you can identify the USB 3.0 port, you can plug the USB cable in and enjoy ten times more speed than USB 2.0. After identifying the port, you need to plug in your USB 3.0 cable, and you can cut down on file transfer time without any hassle.
This blog post will show you how to find and plug in the USB port. If you are ready to know more, read on.
How Do You Know If Your Motherboard Has USB 3.0?
One thing to know is that your motherboard may only be equipped with USB 2.0, so do not be disappointed if you cannot find the USB 3.0 port on your motherboard. There are a few ways you can tell if your motherboard has USB 3.0 ports.
The first thing to do is check the physical ports on the computer. USB 3.0 ports are usually blue. So, if you find a blue USB port on your computer, then your computer can use USB 3.0. Also, you can check for the USB 3.0 logo, SS (SuperSpeed). If you see the logo on your system, it is equipped with a 3.0 USB.
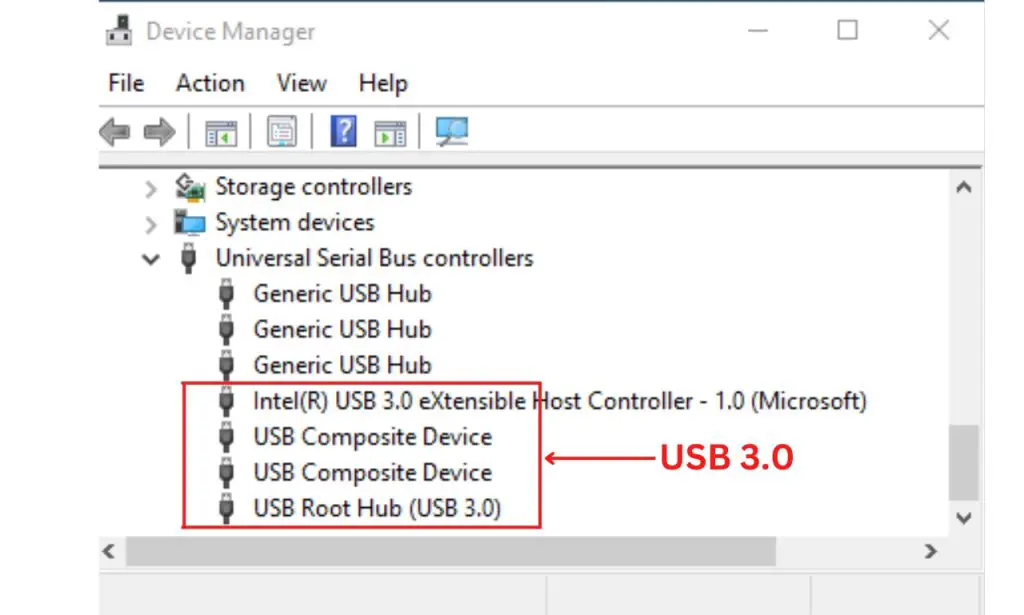
You can confirm if your computer has a USB 3.0 port by checking it in the Device Manager.

To get into the Device Manager:
Click the Start menu and open the Control Panel.
Click “Hardware and Sound,” followed by “Device Manager.”
Scroll down until you find the “Universal Serial Bus Controller.”
Expand the section. If you see USB 3.0 or xHCI, your computer is equipped with USB 3.0.
If you cannot find USB 3.0 or xHCI, your computer is not using USB 3.0. If you do not want to do that long search, you can type “Device Manager” in the search box and click on it. Scroll down to the “Universal Serial Bus controller.” Expand it, and you can check for USB 3.0.
How Do You Plug In Your USB 3.0 And Where Do You Plug It?
Once you identify the USB 3.0 port, you can plug in the cable. The USB 3.0 cable and port are typically blue, but the port color may not be blue in some newer computers. However, the cable port is always blue, and the pins are the same if you look at the port to plug in the table.
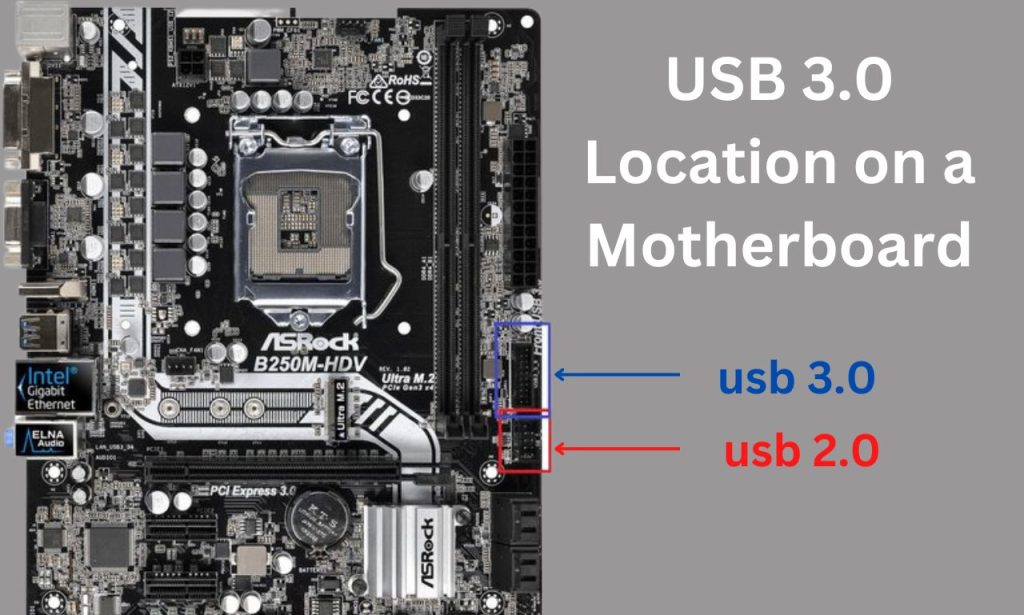
While the USB 3.0 port or header is usually located on the right side or bottom of the motherboard, not all manufacturers may have the port in the exact location. You have to check the manual to locate the port effortlessly. Locating the cable is easy, but you should also check the manual to locate where to plug the USB 3.0 cable.
You can also identify the header to plug the USB 3.0 cable by counting the number of pins. It has 19 pins in a 10×2 arrangement: 10 in the first row and 9 in the second row. Once you find that with the help of the manual, plug the cable in, and you are ready to use USB 3.0.
Do you need USB 3.0?
Yes. The next generation of USBs offers a significant speed increase over its predecessors. With data transfer speeds of up to 5 GB/s, USB 3.0 is ideal for high-speed data storage and transfer. USB 3.0 is also backward compatible with older versions of USB so that you can use it with many devices.
If you want to make data transfers faster and smoother, USB 3.0 is the right tool.
How to Upgrade from USB 2.0 to USB 3.0
Many computers today come with USB 3.0 ports, but some older models only have USB 2.0. If you have an older computer, you may wonder how to upgrade to USB 3.0. Luckily, it is not too difficult to do.
So, if you are ready to upgrade to USB 3.0, let’s get started. The first thing you will need to do is purchase a USB 3.0 adapter. These are inexpensive and can be found online or at your local electronics store.
Once you have your adapter, plug it into one of your USB 2.0 ports.
Now you have to wait for your computer to find the adapter and automatically install its driver. Once it does, you can continue to enjoy the speed of USB 3.0. If the system fails to install the driver for your adapter automatically, you will need to download and install the drivers for your adapter manually.
Most adapters come with a CD that has the drivers on it. If your adapter did not come with a CD, you could usually find the drivers on the manufacturer’s website.
Once the drivers are installed, you should be able to use your new USB 3.0 ports just like any other USB port.
Keep in mind that not all devices will work with USB 3.0. Specific devices like scanners and printers may only work with USB 2.0.
If you are unsure if a device will work with USB 3.0, you can check the manufacturer’s website or documentation.
One of the great things about USB 3.0 is that it is backward compatible with older USB hardware and connections. This means that if you have a USB 3.0 device, you can use it with a USB 2.0 port.
The performance will be slower, but it will still work.
The other great thing about USB 3.0 is that it is much faster than older versions of USB. If you have a device that supports USB 3.0, you will see a significant increase in performance.
USB 3.0 Motherboard Connector Splitter
The USB 3.0 motherboard connector splitter is a device that allows you to connect multiple USB devices to a single USB 3.0 port on your motherboard. This can be useful if you have a lot of USB devices that you want to connect to your computer but only a limited number of USB ports on your motherboard.
The splitter allows you to connect up to four USB devices to one port, giving you more flexibility in connecting your devices.
The splitter is easy to use; connect the USB 3.0 port on your motherboard to the splitter, then connect your devices to the appropriate ports on the splitter. The splitter has all the cables and connectors, so you should not have trouble getting it up and running.
There are many suitable splitters if you want to connect more than two USB 3.0 devices to your computer.
USB 3.0 Front Panel Connector
The USB 3.0 Front Panel Connector is a unique USB for computer cases. This connector allows you to connect USB devices to the front of your computer case, making it easier to access them.
The USB 3.0 Front Panel Connector is backward compatible with USB 2.0 and 1.1 devices so that you can use your existing USB devices. This connector also works with a wide range of USB 3.0 devices, such as scanners, printers, and external hard drives.
If you are looking for a way to make your USB devices more accessible, the USB 3.0 Front Panel Connector is a great option.
Conclusion
Here are a few things to remember when plugging in USB 3.0 on a motherboard. First, locate the USB 3.0 ports on your motherboard; they usually have a blue color. You will also need to locate the USB 3.0 cable, usually blue.
Once you locate the 3.0 header, which is supposed to have 19 pins with ten pins on top and nine pins below, you should plug the cable in there, and you can begin to enjoy the speed of 3.0. Remember that USB 3.0 is backward compatible with older devices that use USB 2.0 or USB 1.1.


![What Are Motherboard Standoffs? [Guide] 5 What Are Motherboard Standoffs](https://bestofmotherboard.com/wp-content/uploads/2022/01/What-Are-Motherboard-Standoffs.jpg)
![Does it Matter Which PCIe x16 slot I Use? [Guide] 6 Does it Matter Which PCIe x16 slot I Use](https://bestofmotherboard.com/wp-content/uploads/2022/01/Does-it-Matter-Which-PCIe-x16-slot-I-Use.jpg)